Working with YARA
Intro
In this post we’ll walk through a quick intro to YARA, as well as how to test, and improve rules.
The YARA docs are a good place to get started with some example rules.
Let’s take a super simple Windows executable and make a YARA rule for it.
Hello, World!
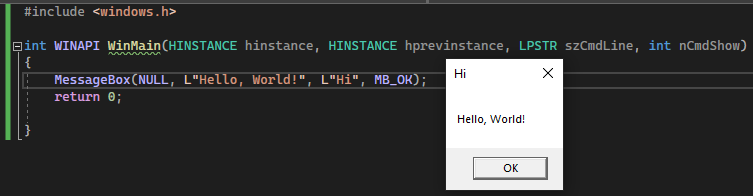
As you can see in the screenshot above, the program we’re working with simply pops a message box with the text “Hello, World!”.
If we use the SysInternals tool strings we can find this “Hello, World!” string in the binary (the -o argument tells us the offset in the file).
strings -o .\msgbox.exe | select-string "Hello"

5192:Hello, World!
If we go to that offset in our hex editor, we can see the string in the hex.
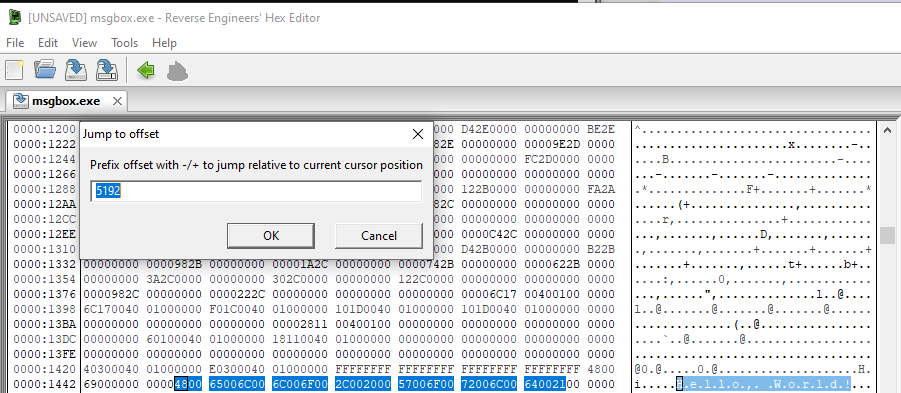
Cool, let’s build out our YARA rule.
rule hello_world{
	meta:
		description = "Finding the 'Hello, World!' string"
	strings:
		$hello_world = "Hello, World!"
	condition:
		$hello_world

}
But when scanned with our rule, yara64 .\yara\hello_world.yar . no matches are returned. What gives?
As you saw in the hex editor and the code for the program, the “Hello, World!” string is in Unicode (a.k.a. wide) - we need to modify our YARA rule to accomodate for that.
rule hello_world{
	meta:
		description = "Finding the 'Hello, World!' string"
	strings:
		$hello_world = "Hello, World!" wide
	condition:
		$hello_world

}
If we run our scan again, wait - we got two results!
yara64 .\yara\hello_world.yar .
hello_world .\hello.txt
hello_world .\msgbox.exe
hello.txt is just a plain text file that contains “Hello, World!”. We’re only looking for our Windows executable. Each file follows a certain format, that format is typically identified in the first few bytes of the header. If we open up our hex editor again, we’ll see that our Windows executable starts with the text “MZ”, or “4D5A” in hex.

Whereas our text file has a different header altogether.

Let’s improve our YARA rule to include an additional condition to eliminate this false positive.
rule hello_world{
	meta:
		description = "Finding the 'Hello, World!' string"
	strings:
		$MZ = "MZ"
		$hello_world = "Hello, World!" wide
	condition:
		$MZ and $hello_world
}
Foiled again!
yara64 .\yara\hello_world.yar .
hello_world .\hello.txt
hello_world .\msgbox.exe
Okay let’s look at the full contents on the hello.txt file to understand what’s going on.

It looks like for some reason, this text file has an ASCII string “MZ” appended to the end of the file. This highlights an important concept when working with YARA rules - looking for values at certain offsets is more accurate and valuable than blanket searching the entire file.
Jumping back to our YARA rule once more, let’s add an additional condition for where we expect to see our “MZ” string.
rule hello_world{
	meta:
		description = "Finding the 'Hello, World!' string"
	strings:
		$MZ = "MZ"
		$hello_world = "Hello, World!" wide
	condition:
		$MZ at 0 and $hello_world
}
Crossing our fingers and running the scan again…
yara64 .\yara\hello_world.yar .
hello_world .\msgbox.exe
Success! We’ve finally rid ourselves of the hello.txt false positive.
Often, malware authors are fighting this battle with AV vendors. Certain suspicious strings or common code can raise the alarm. Often, they choose to get around this by a technique called “packing”.
Introducing UPX
UPX is an open source packer available on GitHub that produces a self-contained, compressed, executable that unpacks at runtime. This has the benefits of reduced file size, and the packing of built in strings. UPX is trivial to unpack, most malware packers require a bit more effort.
Let’s pack our message box executable.
upx upx_msgbox.exe
                       Ultimate Packer for eXecutables
                          Copyright (C) 1996 - 2020
UPX 3.96w       Markus Oberhumer, Laszlo Molnar & John Reiser   Jan 23rd 2020

        File size         Ratio      Format      Name
   --------------------   ------   -----------   -----------
    105472 ->     60928   57.77%    win64/pe     upx_msgbox.exe                                                                                                                                                                         Packed 1 file.
If we run our strings command again on the newly packed executable, it returns no results.
strings -o .\upx_msgbox.exe | select-string "Hello"
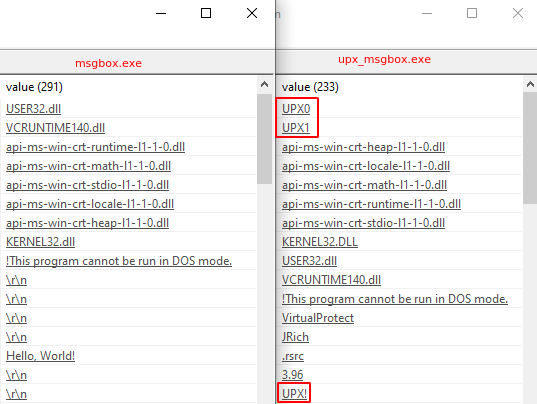
If we test our previous YARA rule, we unfortunately also return no results. A useful way to triage what changed between the two samples, is to open them up side by side in a tool like pestudio. If we hop immediately to the strings tab, we can see a few changes immediately highlighted as related to UPX, that don’t exist in the previous binary.
If we remember our lesson from our hello.txt file - we know that we need to be more precise about where we’re searching for these strings in order to prevent false positives. We also know that we’re only interested in Windows portable executable files, and that the PE header is most often 1024 bytes or smaller in size (can vary from executable to executable).
We also know that YARA supports regular expressions, so let’s take advantage of both of those facts.
rule upx_packed{
	meta:
		description = "Likely UPX packed based on strings"

	strings:
		$MZ = "MZ"
		$UPX = /UPX\d/

	condition:
		$MZ at 0 and $UPX in (0..1024)
}
If we scan with this rule, we successfully find our UPX packed malware!
yara64 -s .\yara\upx_packed.yar .
upx_packed .\upx_msgbox.exe
0x0:$MZ: MZ
0x200:$UPX: UPX0
0x228:$UPX: UPX1
YARA allows us to get deeper and more precise with our rule, however. Rather than relying on a guess about the size of the PE header, we can actually import additional functionality that will parse it, and we can ensure our UPX strings are showing up in the correct places. This functionality is contained in the YARA pe module.
We can rewrite our rule to look more like this:
import "pe"

rule upx_packed{
	meta:
		description = "Likely UPX packed based on UPX section names..."

	condition:
		pe.is_pe
		and for any i in (0..pe.number_of_sections-1): (pe.sections[i].name contains "UPX")
}
pe.is_pe performs more robust checks than our simple “MZ” at 0 condition. The next condition is a bit more complicated - let’s go back to pestudio.
In the UPX packed sample, we can see that the “UPX0” and “UPX1” strings show up as the secion names

The YARA condition above is looping through each section, and checking if the name value contains UPX. But what happens if an attacker were to modify these strings? Using a hex editor (or CFF Explorer) you can modify the section header names and again break our YARA signature.
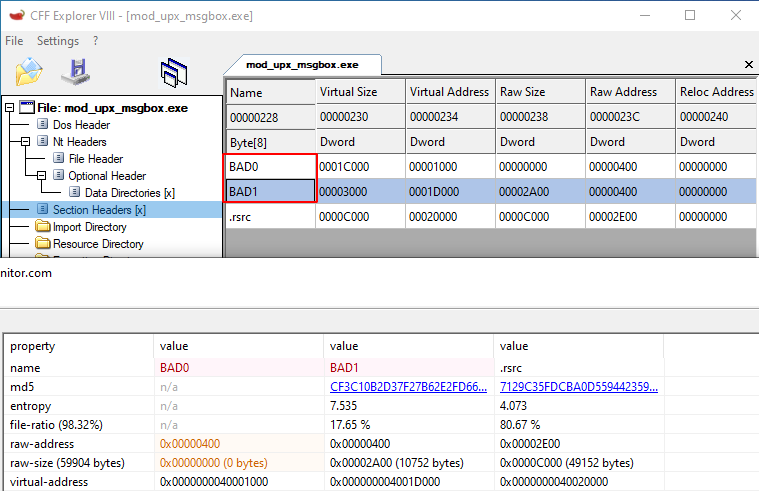
All is not lost! If we refer back to pestudio we see that the sections have unusual memory permissions, helpfully highlighted in red by default - these indicate that the “UPX0” and “UPX1” sections are writable and executable this is a highly suspect permission set. Unfortunately, other types of programs (and packers) use this RWX memory, so we need to add in another check to increase our likelihood of the sample being UPX packed.
There’s still the potential for a false positive Windows executable with self modidying code, that happens to also have a string “UPX”, but it’s much higher fidelity.
import "pe"

rule upx_packed{
	meta:
		description = "Likely UPX packed based on UPX strings and RWX sections"

	strings:
		$UPX = "UPX"

	condition:
		pe.is_pe
		and $UPX
		and (for any i in (0..pe.number_of_sections-1): (pe.sections[i].name contains "UPX")
		or for any i in (0..pe.number_of_sections-1): ((pe.sections[i].characteristics & pe.SECTION_MEM_EXECUTE) and (pe.sections[i].characteristics & pe.SECTION_MEM_WRITE)))
}
…but what if they patch this string too?
Deeper down the rabbit hole
There is one last, ultra-resilient way to build your YARA rules. It is the most painful, but also the hardest to evade.
OPCODES.
Every assembly instruction has a corresponding opcode - for example NOP (no operation) is 0x90, INC EAX is 0x40. By understanding how the UPX unpacking algorithm works, and by creating a YARA rule for the corresponding assembly opcodes, we can finally create a rule that can survive patched strings and still precisely match UPX.
A good overview of how to manually unpack UPX is available here. One of the major takeaways is that the “UPX0” section is empty and contains no code. The entry point for the executable is in “UPX1”. The code in this section unpacks the real code, and writes it to “UPX0”. In our disassembler, we’ll see the respective memory addresses of these two sections.
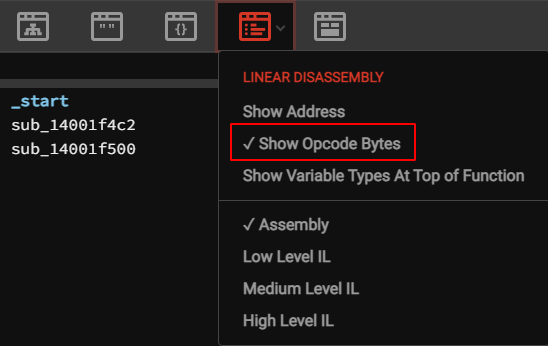
We’ll use the free Binary Ninja Cloud disassembler to figure that out. We have to change some settings to turn on Opcode Bytes, and we’ll also need to be in disassembly view
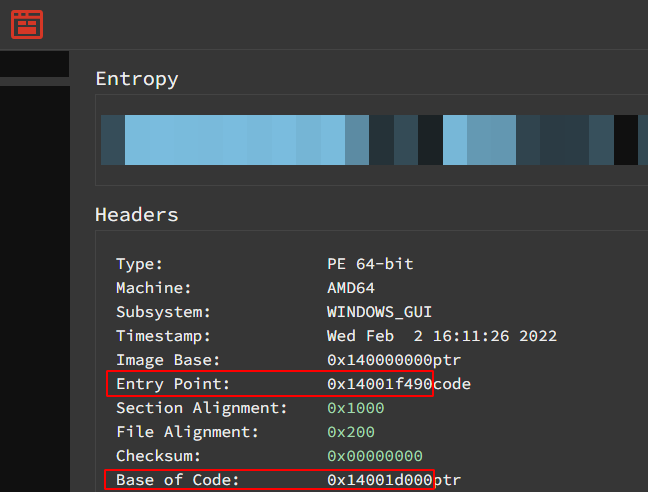
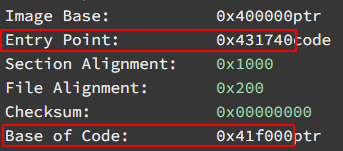
In the triage summary view, we’ll see the address of the entry point (“UPX1”) and the base of code (“UPX0”).
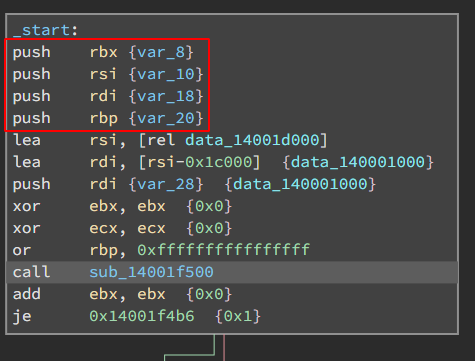
At some point, after unpacking, the control flow will be passed back to the unpacked code in the “UPX0” section. In order to preserve the arguments passed to the program, the first thing the UPX algorithm does is store those values on the stack. The final things that the algorithm will do is restore (pop) those values, and then jump to a location in memory inside of the “UPX0” section.
In the _start function we see the initial push instructions.
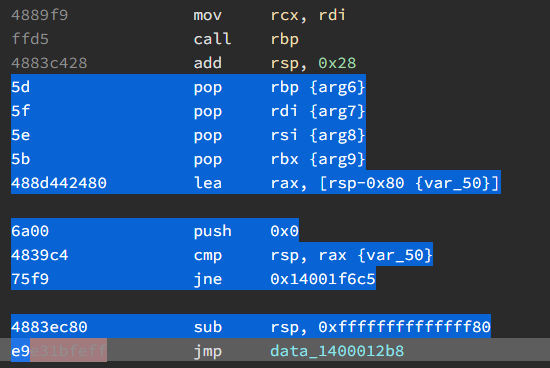
If we do a quick once over of the code within the subsequent function call, we find the jump to the UPX0 memory section, preceded by 4 pops.

To confirm, we can double click on the variable name data_1400012b8 and confirm that it is all zeroed out in the on-disk binary, and that it is in the UPX0 section.
So what now? If we jump over to these code sections in the Linear Disassembler, we can view the associated opcodes and build out our YARA rule. It’s important to note that specific addresses need to be removed or wildcarded out to ensure our rule has more durability. You’ll notice that with the tailjump in the highlighting, and the YARA rule below.
import "pe"

rule likely_upx_tailjump{
	meta:
		description = "64bit UPX packed binaries contain a tailjump"

	strings:
		$tailjump = { 5d 5f 5e 5b 48 8d 44 24 80 6a 00 48 39 c4 75 f9 48 83 ec 80 e9 }

	condition:
		pe.is_pe
		and $tailjump
}
If we test this rule… it works! It finds our UPX packed sample with all UPX strings removed. It’s important to test our rules though - so I copied cmd.exe to the local directory, UPX packed it, and our YARA rule matches that as well!
cp c:\windows\system32\cmd.exe .
upx cmd.exe

yara64 -s .\yara\likely_upx_tailjump.yar .
likely_upx_tailjump .\cmd.exe
0x1d213:$tailjump: 5D 5F 5E 5B 48 8D 44 24 80 6A 00 48 39 C4 75 F9 48 83 EC 80 E9
likely_upx_tailjump .\mod_upx_msgbox.exe
0x2abc:$tailjump: 5D 5F 5E 5B 48 8D 44 24 80 6A 00 48 39 C4 75 F9 48 83 EC 80 E9
But if we test it on a 32 bit binary (i.e. c:\windows\syswow64\notepad.exe) it fails! Unfortunately, for 32 bit binaries we need to start the opcode discovery process over again.
To demonstrate a different approach, let’s stop our disassembly at the _start function and zero in on the pushad instruction, since it is rare to find as the first instruction at the entry point.

import "pe"

rule likely_upx_pushad_entry{
	meta:
		description = "32bit UPX packed binaries contain PUSHAD at the address of entrypoint"
	strings:
		$pushad = { 60 be ?? ?? ?? ?? 8d be }
	condition:
		pe.is_pe
		and $pushad at pe.entry_point
}
This successfully finds our 32bit UPX packed executable.
Testing and performance
Throughout the YARA rule development process, I like to test my rules against c:\windows and a malware database like theZoo.
Since that malware database is quite large, and I don’t want all of those samples hanging out on my local system - I have a separate Linux server that hosts them.
Let’s evaluate “likely_upx_pushad_entry”. We can run the wc -l command on the output from YARA to get a count of samples the rule hit on. This is useful for gauging if your rule is better or worse than your previous iteration.
yara -r likely_upx_pushad_entry.yar ../malwarebins | wc -l
21
From the performance perspective, Linux has a built in command time. time can be confusing depending on the current workload of the system. Using “user” time plus “sys” time will give you a reliable metric.
Let’s evaluate our “likely_upx_pushad_entry” rule.
time yara -r likely_upx_pushad_entry.yar ../malwarebins
...[truncated]...
real	0m3.124s
user	0m9.549s
sys	0m1.967s
It is very slow, and probably due for refinement! How does that compare to our tailjump for 64 bit binaries?
time yara -r likely_upx_tailjump.yar ../malwarebins
...[truncated]...
real	0m1.104s
user	0m5.676s
sys	0m0.615s
The tailjump rule is quite a bit faster - likely because it’s more specific and precise and doesn’t rely on wildcarding. Can we make it faster by removing the PE import?
time yara -r likely_upx_tailjump.yar ../malwarebins
...[truncated]...
real	0m0.963s
user	0m4.713s
sys	0m0.409s
In fact we can make it quite a bit faster!
It’s important to weigh the pros and cons of additional rule complexity and dependencies. Performance may matter a whole lot more if you’re scanning inbound email traffic for an organization, but less if you’re running a one time scan against a malware database. A few seconds may not seem like a whole lot, but if you’re stacking a lot of rules it definitely adds up!
Hopefully you enjoyed this rough intro to YARA - feedback welcome :-)